File Structure
Small sites rarely need to have more than just an image folder, but
once your site grows beyond ten pages or so you will need to create
some sort of organization within your site. Below is a recommended
way of organizing the contents of or site. It is only a suggestion,
and by no means, the only way to organize. Just like standard filing
systems everyone has their own personal style and any one will do.
Keep in mind that the more individuals there are editing your site
the more important it is to have a standard structure that everyone
follows.
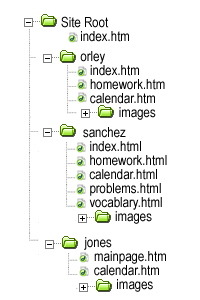
 The
file system to the left shows a very simple site created by several
teachers. Notice the main index page is not contained within any folder.
It sits in the root with each teacher's personal folder. Two of the
teachers have index pages within their folders; the third does not.
There is a mix of .htm and .html extensions. Within a site, it is generally
recommended to have the same extensions, but the site functions the
same if they are not. Also, each teacher has their own image folder.
The
file system to the left shows a very simple site created by several
teachers. Notice the main index page is not contained within any folder.
It sits in the root with each teacher's personal folder. Two of the
teachers have index pages within their folders; the third does not.
There is a mix of .htm and .html extensions. Within a site, it is generally
recommended to have the same extensions, but the site functions the
same if they are not. Also, each teacher has their own image folder.
Also notice the naming conventions. Most modern servers are very forgiving; however, some older ones are still very picky about the names you use to save files. three basic rules that will keep you out of trouble are:
1. Do not use capitals
2. Do not use spaces use the underscore _ instead.
3. Do not use punctuation.
Creating a Folder for Your Files
- Find and open the folder on the network that you will use. (Preferably your worksite folder or a removable flash drive, but any folder you have direct access to from across the district or home will do.)
- Create a new folder and title it using the naming conventions above. Make it descriptive enough you will remember what it is.
- Create a folder inside and title it images or media. More advanced users may want to create a scripts folder as well as a css folder.

 The
file system to the left shows a very simple site created by several
teachers. Notice the main index page is not contained within any folder.
It sits in the root with each teacher's personal folder. Two of the
teachers have index pages within their folders; the third does not.
There is a mix of .htm and .html extensions. Within a site, it is generally
recommended to have the same extensions, but the site functions the
same if they are not. Also, each teacher has their own image folder.
The
file system to the left shows a very simple site created by several
teachers. Notice the main index page is not contained within any folder.
It sits in the root with each teacher's personal folder. Two of the
teachers have index pages within their folders; the third does not.
There is a mix of .htm and .html extensions. Within a site, it is generally
recommended to have the same extensions, but the site functions the
same if they are not. Also, each teacher has their own image folder.