Creating a Site

Local Sites
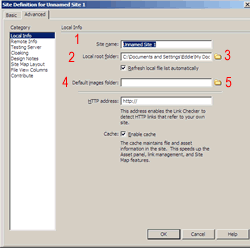
From the Site menu at the top select - Manage sites. In the dialogue
box that opens select New... and Site. The properties window to the
left should appear.
1. Enter the name for your site in the
first box. You may use any characters but avoid punctuation. Only you
will see this name so use something descriptive to distinguish it from
others you create. i.e. Work Site, Home site, Personal, etc.
2. Define the local root. This is the starting place for your site.
Either type the address of the folder you created to hold your files
or (3.) select the yellow folder next to the box and browse to it.
You can also create a new folder by browsing to the location you want
the file and selecting file/new.
4. Select the images folder. This is the
folder that will hold all of the pictures and other media included
in your site. Again, either type the address of the folder you created
to hold your images or (5.)
select the yellow folder next to the box and browse to it. You have
the same option of creating it new as well. Note: the images folder
must be inside the root folder or you will receive an error. Finally,
Select OK
Remote Sites

Remotes sites are completely dependent on the server you are placing the files. Every location has different access rules and requirements. Contact your provider for details.
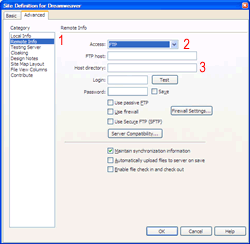
1. To create a remote site. select remote from the left hand side.
2. In this course we will be using a local server on the network. So select Local/network. Note: The most common form of uploading to a commercial site is FTP (file transfer protocol), and you will be using it the most once you have left this course.
3.Enter the following replacing the aaa with your three initials: \\chs-tech\dreamweaver\aaa
This is a special folder created on the tech web server for just this class. To see your site once it is uploaded, open your browser and type http://chs-tech/dreamweaver/ and you should see the site list page.


