Inserting a Table
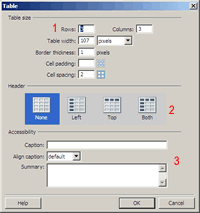
Select Insert/Table from the menus at the top of the page. In the
dialogue box, choose the number of rows and columns (1).
Determine the width you need in pixels or percentage of screen. Enter
a width for the borders around the outside. Cell padding is the margin
within a cell. If you select zero your text will bump up right next
to the edges. Two to five pixels is usually best. Cell spacing is the
gap between cells.
Next, (2)decide if there will be a header
row. This step is important in making calendars and providing accessibility.
Last, (3) tables are notoriously difficult
to understand if you are using a screen reader. To facilitate the use
for special needs users a caption and summary help tremendously. The
caption will appear in a regular browser but the summary will be accessible
only to screen readers or someone reading the HTML. Select OK.
Table Properties
Once your table is selected you can edit the properties by clicking
on the outside border. The properties inspector at the bottom will
change to show all the editable features. 
You will notice that some of the features that appear in the insert
box also occur here (i.e. cell padding, border, etc.) You can also
change the background color (or image) and the border color.


