Font & Color
 To change
any of the properties of a piece of text it must first be highlighted
by clicking and dragging over the the selection. Once highlighted you
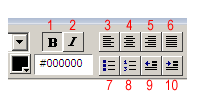
can change the font-group
from the drop down box (1).
Notice you cannot specify a particular font. The browser your user has
defines which fonts are used by a page. You can specify a particular
group and when your user loads the page their software will assign the
default from that group. The style drop down (2)
is used with Cascading Style Sheets in a later tutorial. To set the size
of a highlighted selection, use the size drop down box (3)
The menu contains a much wider variety of selections than a standard
word processor. You can assign a relative size using the small/medium/large
options or you can assign a numeric value. If you choose a number you
must define the unit as well by choosing the drop down box immediately
to the right. That menu contains selections such as percent, pixels,
and points.
 For color,
click on the small arrow in the lower right of the colored square (4).
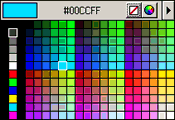
The menu to the right will appear. Standard web colors are shown in
the table. Use the eye dropper to select a color from the table or anywhere
else on the page. The hexadecimal value will show in the top of the window.
Once you click the color will be assigned and the window will close.
If you need a color not in the table select the multi-colored globe in
the upper right for more options. The white square with the red slash
through it is no color.


